



Yanmar AF-15 to AF-18 operation and starting: here’s how it works
Yanmar AF-15 to AF-18 operation and starting: here's how it works
The operation of the Yanmar AF-15, AF-16, AF-17 and AF-18 is largely labeled in Japanese, and that's exactly why we've laid everything out here: what each light on the dashboard means, how the complete starting procedure works (including the preheating times), how to shift gears, and what the manual says about the running-in period.
Suitable for the entire series: Yanmar Forte AF-15, AF-16, AF-17 and AF-18, including all versions. The operation is virtually identical for all models; OK-UFO and EG-UFO versions have extra switches for automatic depth and slope control.
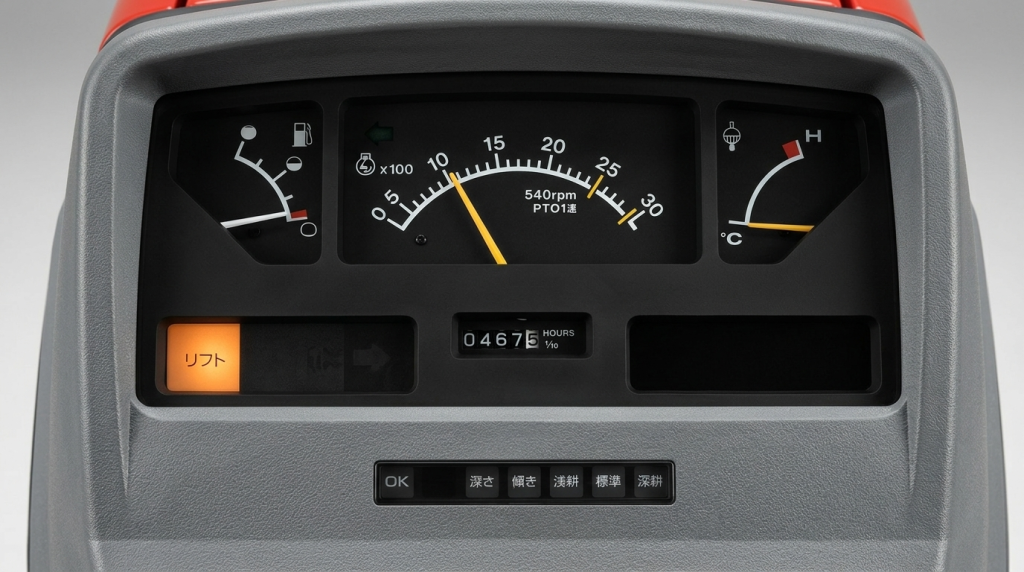
Yanmar AF series dashboard: what the lights and gauges mean
| Light / gauge | Meaning |
|---|---|
| Preheat light (thermostart) | Lights up when the ignition is on; only start once it has gone out on its own. With a warm engine it goes out almost immediately |
| Oil pressure light | Lights up when the ignition is on, goes out after starting. If it comes on while running: stop the engine immediately — lubrication problem |
| Charge light | Goes out as soon as the engine is running and the alternator is charging. Below 1000 rpm the alternator doesn't charge; maintain at least 1500 rpm |
| Water temperature gauge | If the needle points into the red zone: stop work and check the engine |
| Tachometer with hour meter | Scale ×100 (0–3000 rpm) with a marking for 540 PTO rpm in PTO position 1; the hour meter counts in tenths of an hour |
| Fuel gauge | Needle in the hatched area: refuel in time (tank: 20 liters) |
| Lift light (UFO versions) | Lights up when the implement is raised; the engine will not start safely while this is lit — lower it first |
Starting the Yanmar AF-15 to AF-18: the complete procedure
Here's how to start the engine according to the manual:
| Step | Action |
|---|---|
| 1 | Fuel tap to "O" (open) |
| 2 | Main shift lever, shuttle lever (F/R) and PTO lever in neutral |
| 3 | Position lever down, auto-rotary lever in the deepest position; ignition on and check that the lift light is off |
| 4 | Throttle lever at maximum rpm setting |
| 5 | Wait until the preheat light goes out: above 5°C about 1 second, below 5°C about 3 seconds |
| 6 | Fully depress the clutch pedal (start safety switch!) and turn the key to "START"; release as soon as the engine starts |
| 7 | Reduce throttle back to approx. 1500 rpm and let the engine warm up unloaded for about 5 minutes |
Two strict rules from the manual: never run the starter motor for longer than 10 seconds continuously (if it doesn't start, wait at least 1 minute and try again), and never turn the key to START while the engine is already running. The start safety switch via the clutch pedal also means: if the starter motor doesn't turn at all, first check that you're fully depressing the pedal. Stopping is simple: throttle lever to the lowest position and ignition to "OFF".
Yanmar AF series running-in period: the first 50 hours
According to the manual, the first 50 operating hours determine the service life of the machine. Avoid abrupt starts and abrupt braking, no unnecessary top speed or overloading, and only work once the engine is up to temperature. After those 50 hours comes the important running-in service: replace engine oil, transmission oil, oil filter and line filter, and check all bolts — see the maintenance schedule.
Shifting gears on the Yanmar AF series: main, range and shuttle lever
The gearbox consists of three levers. The main shift lever (4 positions) may also be shifted while driving, with the clutch depressed. The range lever (2 positions; 3 on the creep version, including the "C" creep position) and the shuttle lever F/R next to the steering wheel should only be shifted while stationary, with the clutch fully depressed. This gives you 8 forward and 8 reverse gears (12/12 with the creep gearbox). Never rest your foot on the clutch pedal while driving. The brake pedals are separated left and right for tight turns in the field; always couple them together on public roads with the connecting piece — braking on one side only at road speed is extremely dangerous. Engage the parking brake by fully depressing the brake pedal and pulling the locking lever.
Using the Yanmar AF series safely: frame, seatbelt and diff lock
Always drive with the safety frame locked upright and the seatbelt fastened; with the frame folded down it offers no protection and the seatbelt must NOT be worn. Only use the diff lock pedal at low speed when a rear wheel is slipping — and always disengage it before a turn, otherwise the tractor won't steer. Never use the diff lock on public roads. You can read more about working with implements, the lift and the PTO in the article about hydraulics, PTO and implements.