




Iseki TE4270 controls explained — all knobs and levers
The original manual of the Iseki TE4270 isn't always easy to find, so here we've laid out all the controls and the complete starting procedure clearly in plain English. Keep this page handy if you've just gotten a TE4270.
Dashboard and instruments
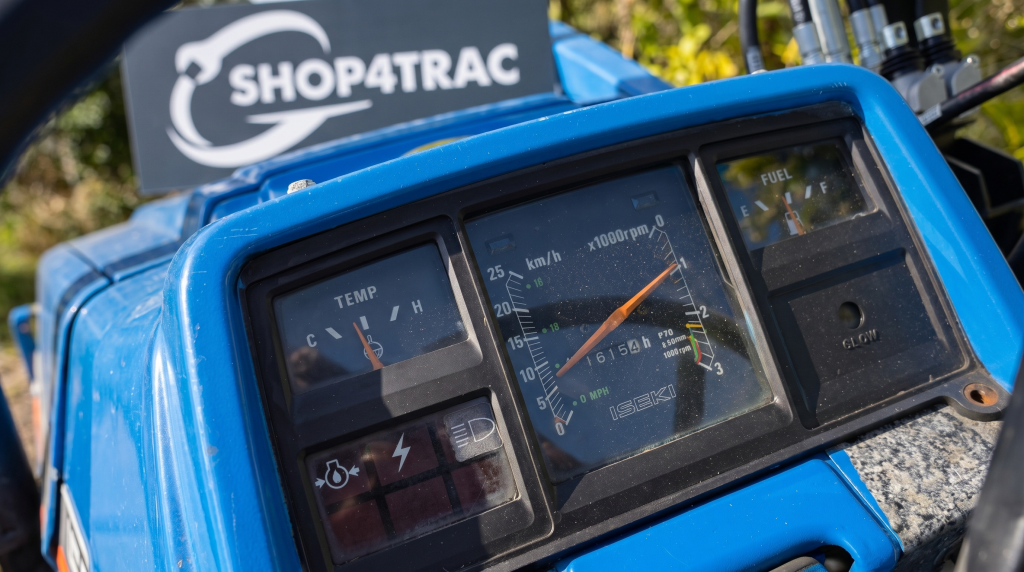
The instrument panel includes:
- Speed/tachometer: the right-hand scale shows engine speed (rpm), the left-hand scale shows driving speed in top gear.
- Thermometer: engine temperature.
- Fuel gauge.
- Hour meter: "1234" means 123.4 operating hours (123 hours and 24 minutes).
- Warning lights: oil pressure light, charge light, glow light, and turn signal indicator lights.
With the ignition "ON", the oil and charge lights should be lit (they go out once the engine is running). The glow light glows red during preheating.
Main switch (ignition switch)
Four positions:
- OFF — everything off, key can be removed.
- ON — power on; this is where the key stays while the engine is running.
- START — operates the starter motor (only with the clutch depressed). The key springs back to ON.
- GLOW — activates the glow plugs for preheating. The key springs back to OFF.
Driving controls
- Throttle lever and accelerator pedal: use the lever for a fixed engine speed (e.g. PTO work), and the pedal for variable driving.
- Clutch pedal: depress quickly, release slowly. Free play should be approximately 20 mm.
- Brake pedals (left/right independent): use them separately for sharp turns; on public roads always link them together. Free play 30-40 mm, and both adjusted equally.
- Parking brake.
- Main gear lever + range lever + creep speed lever: together they determine your speed (see the specifications blog for the complete table).
- 4WD lever (front wheel drive lever): engages front-wheel drive on slippery/wet ground.
- Diff-lock pedal: differential lock. Use only when driving straight ahead and briefly — never in a turn or at high speed.
Hydraulic controls
- Position control lever — raises/lowers the implement and holds it at height.
- Draft control lever (draft control, types M/P/S) — controls based on draft resistance.
- Lowering speed knob — controls how fast the implement lowers; LOCK holds it raised.
PTO controls
The PTO speed lever selects between the two settings (540/1,000 rpm). The PTO clutch lever (or, on the independent version, the PTO switch) engages and disengages the drive. Always stay clear of a rotating PTO.
Starting the engine — step by step
- Set the fuel valve to "0" (open).
- Main gear lever in NEUTRAL.
- PTO lever in NEUTRAL.
- Position and draft control lever to "LOWERING" (implement down).
- Press in the engine stop lever.
- Pull the throttle lever halfway.
- Insert the key and turn to "ON" — check that the oil and charge lights are on.
- Turn to "GLOW" and release once the glow indicator turns bright red (in extreme cold this takes 10-20 seconds). Not needed if the engine is still warm.
- Depress the clutch pedal (otherwise the safety switch will prevent the engine from starting).
- Turn to "START" and release once the engine is running.
Doesn't start? Release the key, wait at least 10 seconds, and try again. Never turn to START while the engine is running. Let the clutch come up slowly and let the engine idle and warm up for approximately 5 minutes.
Stopping the engine
- Push the throttle lever up until the engine is idling.
- Pull out the engine stop lever — the engine stops.
- Turn the key to "OFF" and remove it.
Never switch off the engine at high rpm, and after heavy work let it idle and cool down for about 5 minutes first.
Warming up
Before working, let the engine idle for at least approximately 5 minutes to properly lubricate everything. Insufficient warming up can cause seizing or damage to moving parts.