



Information about the KE70 – KE75 – K2B | How do I find tightening torques – maintenance intervals – installation of parts?
If you have questions about the KE70, KE75, K2B and other K2A engines, you’ve come to the right place!
Since we receive many requests regarding: We are happy to share information about the engines. The engines have been used in various machines and also in boats and mini tractors, for example.
! In this blog post we take a deep dive into the world of Mitsubishi’s reliable power stations. Whether you are a proud owner of a vintage Mitsubishi or are simply interested in the technical finesse of these engines, you have come to the right place.
For smooth operation and optimal performance, it is essential to pay attention to details such as torque , starter and alternator operation, and proper maintenance intervals . In this post we dive deep into the world of these engines, exploring not only the technical specifications but also sharing practical tips on maintenance intervals, using the right oil, and the crucial hours you need to spend taking care of your Mitsubishi engine.
Tightening torques
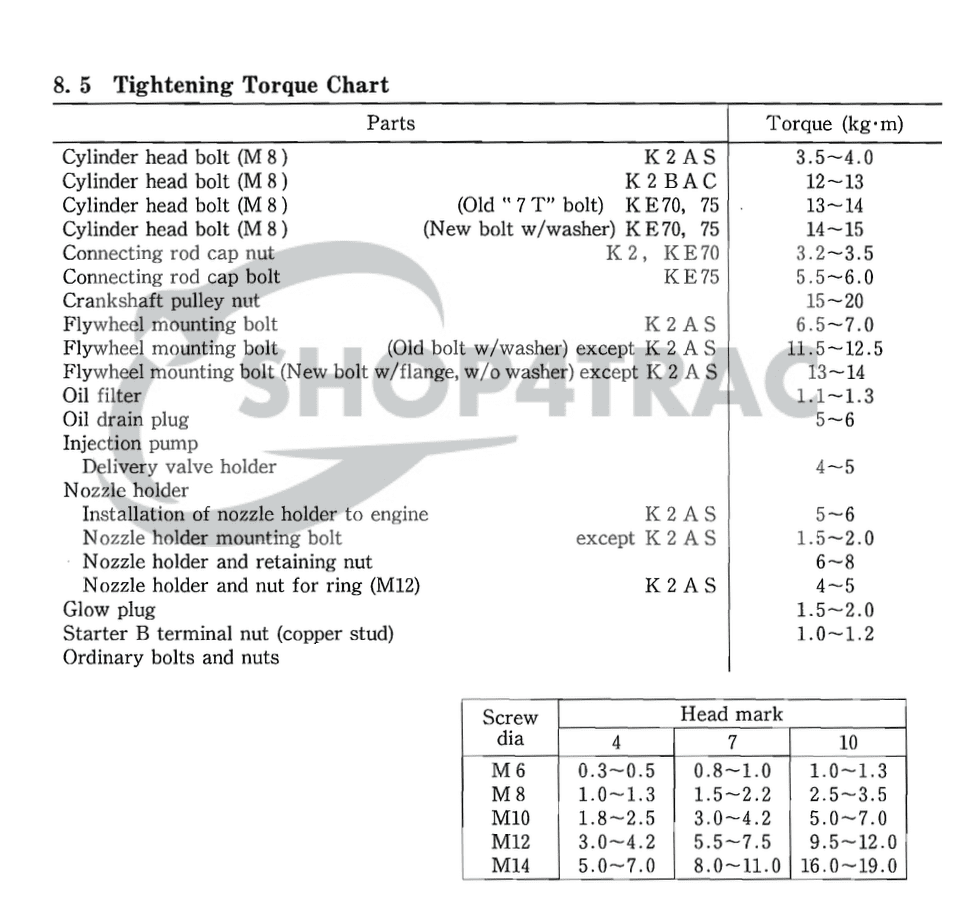
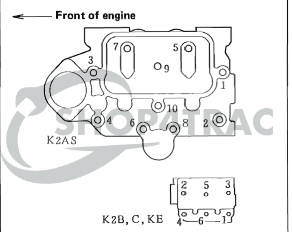
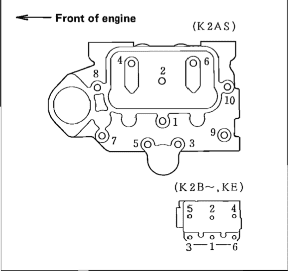
The tightening torques are as shown in the images;
Between 12-15 Kg*M.
Sequence of LOOSENING Cylinder head bolts KE70, KE75, K2A, K2B, K2C
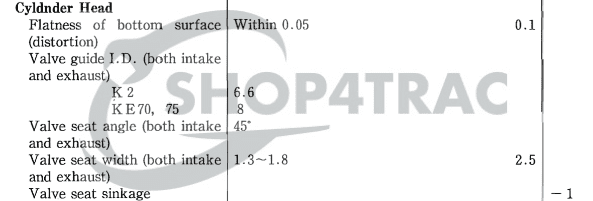
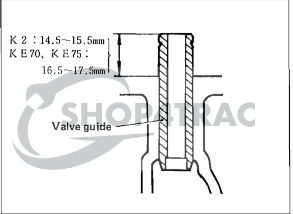
Valve guide Technical data:
Sequence of mounting Cylinder head bolts KE70, KE75, K2A, K2B, K2C
Troubleshooting
1) Slow starting – Starting problems
Solutions regarding start slowly
| Problem | Possible solution |
|---|---|
| Battery | Replace or charge battery |
| Ground cable | Check correct connection of ground cable |
| Starter motor | If there are abnormal sounds or no response: tap with a hammer (temporary solution, not long-term) |
2) Engine not starting – Defective fuel system
| Problem | Possible solution |
|---|---|
| Air in fuel system/lines | Remove air from the fuel system by bleeding air |
| Clogged fuel filter | Clean fuel filter or replace long-term fuel filter |
| Low fuel pump pressure | 1. Check by loosening one of the pressure lines whether diesel comes out when starting. 2. Check that the plungers are not stuck. 3. Replace or overhaul the injection pump if none of the above helps |
| Incorrect nozzle image | Replace the nozzle/injector or use an injector cleaner |
| Filled up with petrol and/or bad diesel | Clean the fuel tank |
| Diesel bacteria or debris in the tank | Keep the tank at least 80% full and avoid moisture to prevent the growth of bacteria and debris. This applies to longer downtimes! |
| Fuel pump timing | Logically, time the engine and fuel pump |
3) Low power – low compression
| Problem | Possible solution |
|---|---|
| Low compression | 1. Measure the compression ratio. 2. Replace worn piston rings |
| Valves | Check valve adjustment and replace valves if worn |
| Wrong mixture of air and fuel | Check fuel filter and air filter |
| Dirty tank | Clean the fuel tank |
| Overheating | 1. Add cooling water if it is low. 2. Check the V-belt to ensure that the water pump rotates fully. 3. Flush a clogged radiator with vinegar |
| Head gasket | Check for overpressure in the cooling system and replace the head gasket if necessary |
4) Oil consumption – leakage
| Problem | Possible solution |
|---|---|
| Oil leakage | 1. Leakage from seals: Replace the seals. 2. Leakage at connections: Tighten bolts if loose. 3. Oil Sump Plug leaking: Replace the copper washer or rubber seal. 4. Valve cover gasket leaking: Replace the gasket. |
| Negative pressure in engine | 1. Incorrectly positioned piston rings, broken piston rings or wear: Check and replace if necessary. 2. Incorrect position of connecting rod or bearings: Check and correct if necessary. 3. Piston damage/wear or scratches in cylinder wall: Inspect with an endoscope through the injectors. |
| Oil visible from exhaust | 1. Leakage at ‘stem seals’ valve stem seals: Replace the seals. 2. Valve or valve guide replacement: Replace damaged parts. |
Cooling system – radiator – water pump
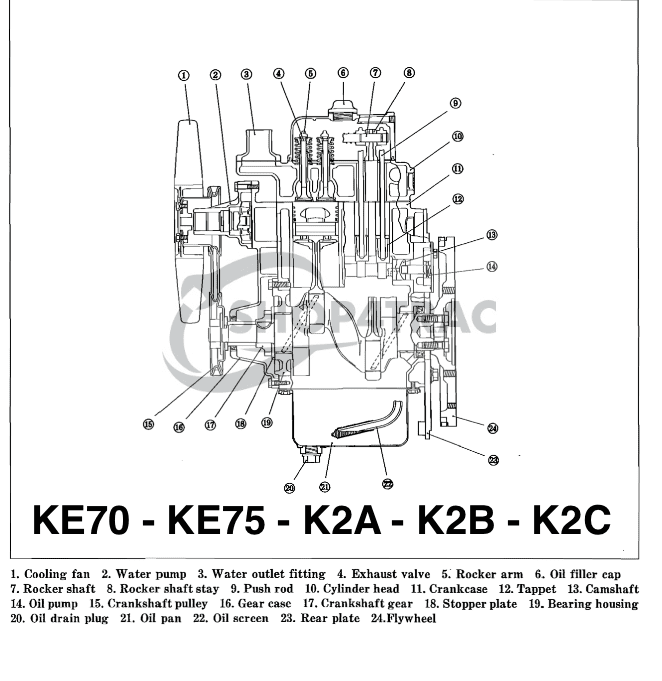
General scheme
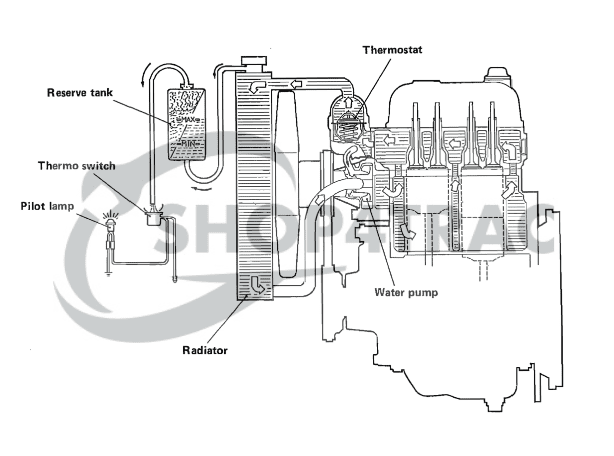
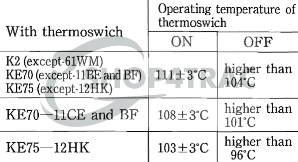
Thermoswitch and its operation
The thermoswitch is located at the front and then the left side of the cylinder head. The switch turns on at 103, 108 or 111 degrees. This depends on the specifications of the engine. When the switch is turned on it obviously jumps
the red light on the dashboard is on. When the thermoswitch is switched on, the cooling system must be checked !
-
Thermo switch properties
-
Properties of Thermostat
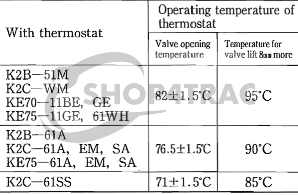
Thermostat temperature
-
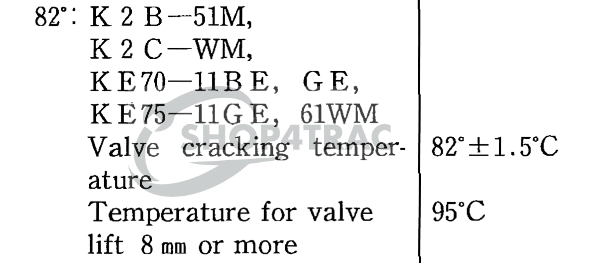
82 degrees
-
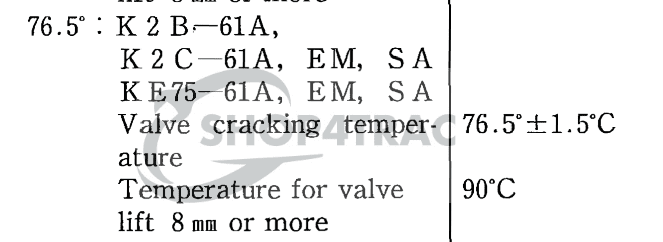
76.5 degrees
Information about Electrical diagram
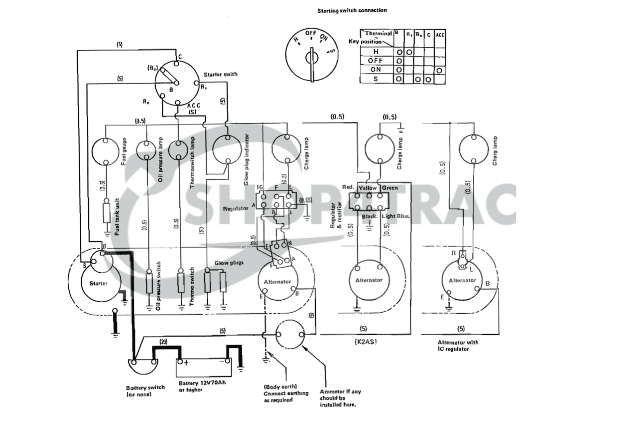
General electrical diagram
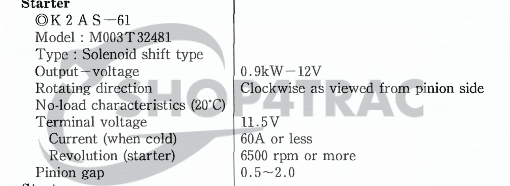
Starter motor K2A S-61
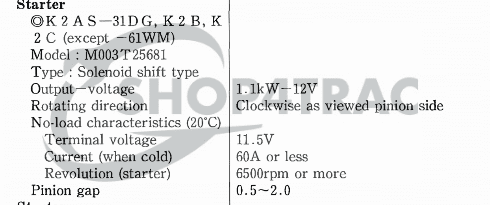
Starter motor K2A S-31DG, K2B, K2C (except K2C-61WM)
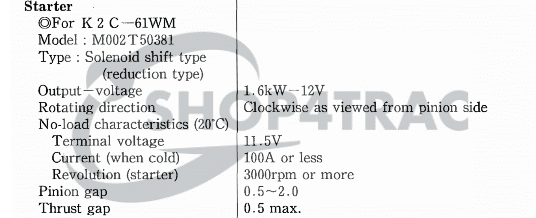
Starter motor K2C-61WM
Starter motor for Iseki KE70, KE75, Mitsubishi
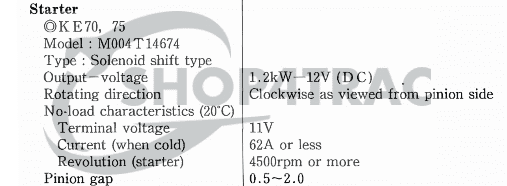
Dynamo information about the Mitsubishi K2A, K2B, K2C
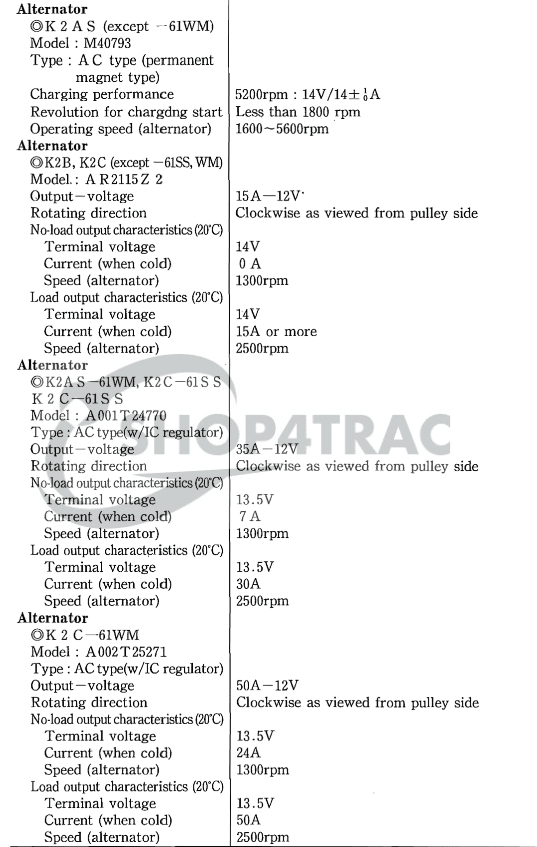
Dynamo information about the Mitsubishi KE70 and KE75
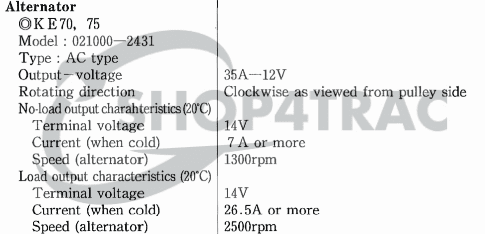
Glow plug information
-
Glow time indication
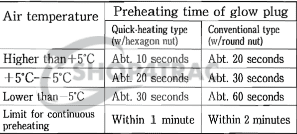
-
Glow plug information
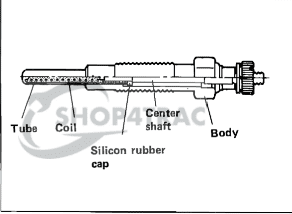
Voltage regulator
-
Wiring colors
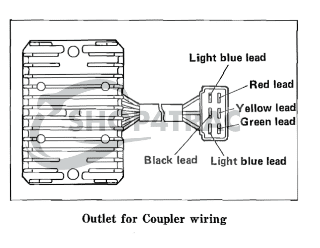
-
Voltage regulator colors
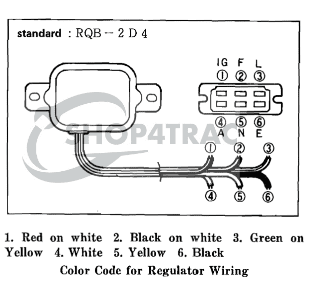
-
Voltage regulator wiring diagram
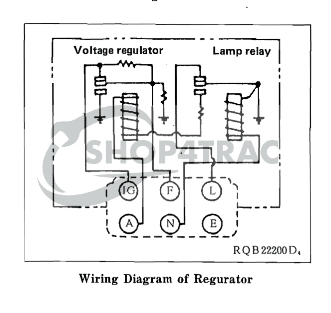
Fuel system
Fuel pump data
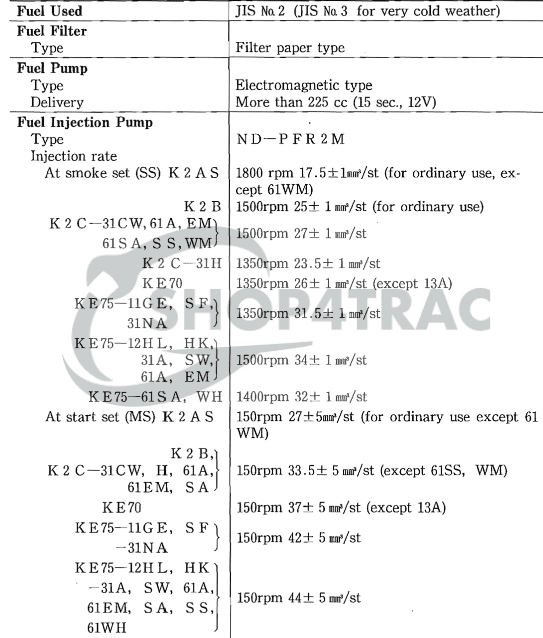
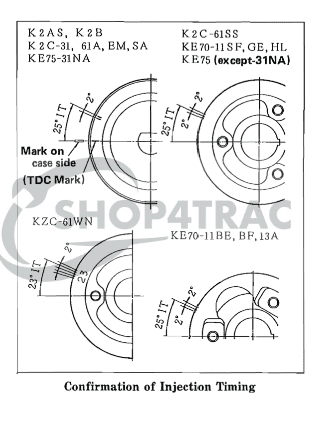
Fuel pump timing
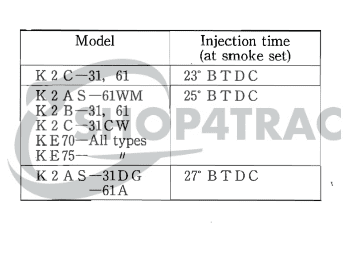
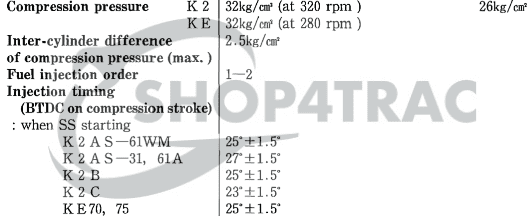
Injection timing table below:
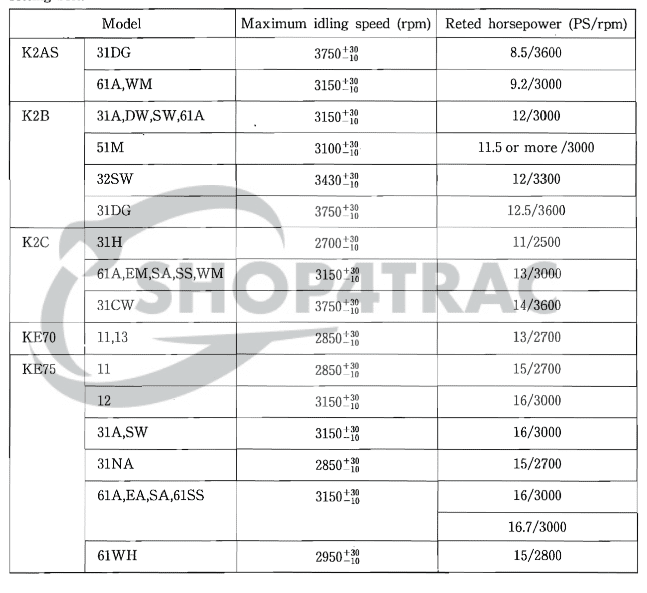
Adjustment of maximum RPM
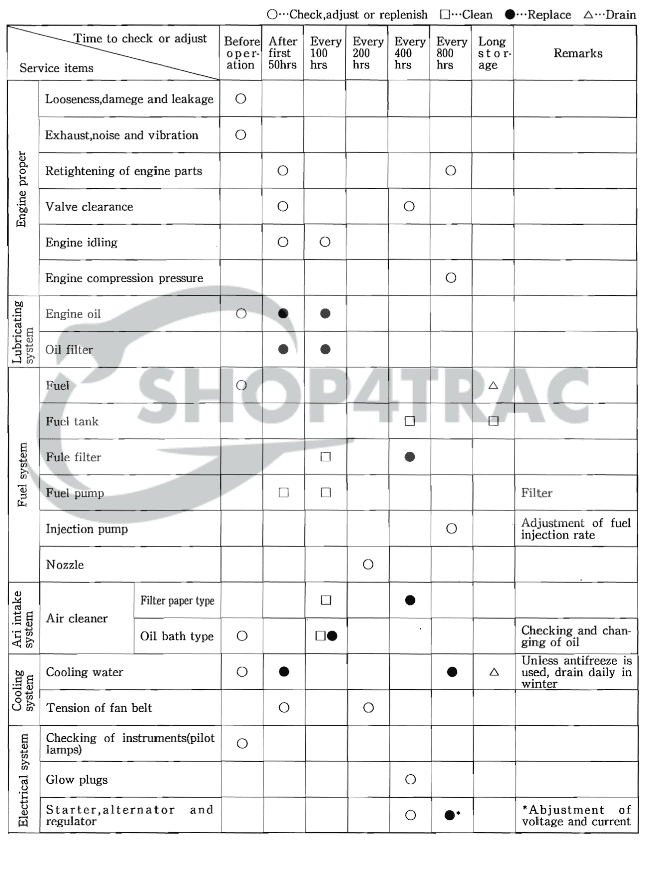
Maintenance information – Service standard
Maintenance intervals
Number of liters of engine oil
K2A
- 2.8 liters (excluding 0.3 liters for oil filter)
K2B, K2C
- 2.5 Liters (excluding 0.3 liters for oil filter)
KE70, KE75
- 2.6 liters (excluding 0.3 liters for oil filter)
Viscosity of engine oil
- 10W30 or 15W40
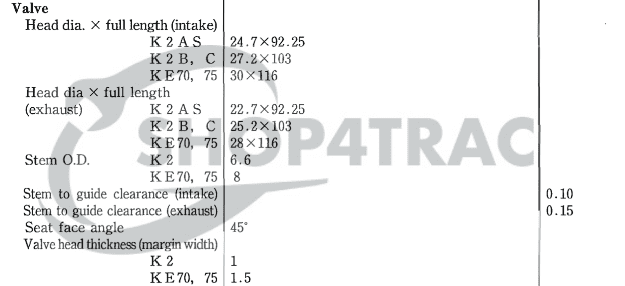
Valve information
Valve information

Valve dimensions
Compression measurement – ratio
Cylinder head data regarding. wear